First download VirtualBox and Ubuntu then install VirtualBox. Once that's complete you should be presented with a window like below. Hit the big blue "New" button in the upper left corner. Then... You know what? Just follow the pictures. I'll be back once you get to the interesting bits. *walks off and gets some water*
Right, now you have a virtual machine with a virtual harddrive. In order to run services on the VM that are accessible to the outside world we'll need to change the network interface of the VM. So open "Settings" and select "Network" in the left menu. Under "Attached to:" select Bridged Adapter. This will give the VM a clear path to your router (or the Internet if you don't have a router). Under "Name:" you select your network card. Most people only have one but if you have several, you might have to change this if the VM can't access the network later on.
While we're in here, we might as well make sure the VM boots our Ubuntu image as well. Go to "CD/DVD-ROM". Open the media manager (marked in red). Select "Add". Browse to the ISO file you downloaded from Ubuntu earlier, select it, and you should have the window looking like below.
Now you're done! Press the big "Start" button and install Ubuntu once the desktop has loaded. The standard button to release your mouse and keyboard from the prison of the VM is your RIGHT CTRL key.
Select your keyboard layout, time zone etc. Just use the default selected option for hard drive partitioning. Let the installation program worry about that stuff. This is what I selected on step 5 where you choose your account name and password. Quite nice not to be forced to log in every time you start the VM.
Once the installtion is done, don't hit "Restart Now". We don't want to restart, we want to shut down. So hit "Continue Testing", then shutdown using the red power button in the upper right corner. Go back into "Settings" and deselect "Mount CD/DVD Drive", hit OK.

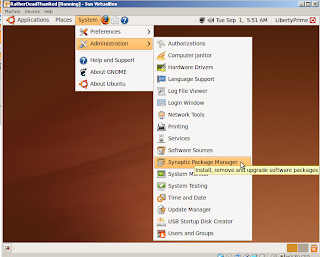
Now Start the machine again. You should see it booting up from the virtual hard drive instead of the CD image now. Now we're gonna install SSH and Privoxy. Open the package manager and enter your password when prompted.
Mark OpenSSH-server and Privoxy for installation, the click Apply.
Congratulations, you are done. Both SSH and Privoxy will autostart with your VM. To actually use it I'm going to assume you're on your windows machine in China/at work. If you want help with this step on a Linux/Mac machine, say so in a comment below.
Download Putty. Open it. Putty is a bit weird in the way that it saves/loads sessions, so don't forget save at the end. Input the your IP. This should be your external IP, meaning the one that is usually given to you router. The port is 22 (default for SSH). Your router should forward port 22 to the IP of your virtual machine. And finally input a name as well.
Next set up a SSH tunnel like the picture, don't forget to click "Add".
Save your session so you can load it next time you open Putty.
Now click "Open" and log into your VM. All that's left is configuring your web browser to use your proxy server. This is what you should do in Firefox:
All done. Happy surfing! In a later post I will explain how to use your proxy server with any program, even those that don't support proxy servers (e.g. games). Because playing games in China/at work would be pretty sweet eh.
Edit: If you get the problem that Putty does not seem to be able to reach your computer you might have to enter some proxy details in it. You're most likely following this guide because the place you are at is using some kind of proxy server in the first place. You'll have to enter the proxy details in Putty here:


Nice. Hoppas denna "proxymjukvaran" funkar bättre för mig än tinyproxy.
ReplyDelete